Sizer user guide
When you run Sizer the ‘sizing arrows’ icon appears in the system tray. The screen grab below shows the Sizer icon in the right most side of the system tray. While this icon is shown, Sizer is active and the following actions can be performed.

Precise resizing
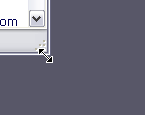
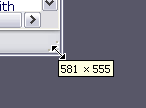
While Sizer is running, move the cursor over the border of a window so that the one of the resizing cursors appear, the screen grab below shows the NW-SE sizing cursor:
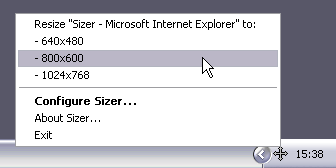
Any edge or corner of the window will do as long as it brings up one of the resizing cursors. When the resizing cursor is displayed, click the right hand mouse button and a pop-up menu will appear as shown below.
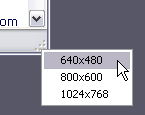
This menu shows a list of sizes, simply select an item from this menu to resize the window to that size. To add new sizes to this menu or redefine existing ones use the Sizer Configuration Dialog.
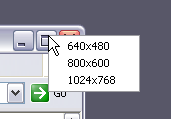
As well as right clicking on the border of a window it is possible to right click on the restore button to bring up the resizing menu, see below. This feature can be useful if the window is currently maximized.
System Menu Integration
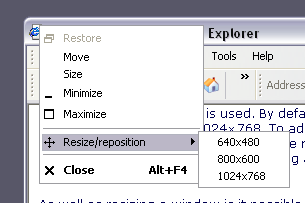
When configured to do so, Sizer will add items to the standard system menu. The system menu is accessed by either right clicking on the title bar or clicking on the program icon at the left of the title bar. Selecting one of a menu items under the Resize/reposition sub-menu, repositions a window in the same way as described earlier.
System Tray Resizing
It seems that quite a few people liked the way the original version of Sizer operated, so from v3.21 this feature that been reintroduced. As an alternative to the precise sizing method described above, it is possible to resize a window directly from the system tray popup menu. Simply right click on the Sizer icon in the system tray, the popup menu will display a set of options to resize the active window to one of the defined sizes (see screenshot below). The first line on the menu is not selectable and is used only to let you know what window Sizer will resize when one of the menu items below it is selected. If the active window is not resizeable then Sizer won’t show these options on the menu.
To use this feature on Windows 7 you should configure the Sizer icon to always show in the System Tray. To do this open Control Panel, select Appearance and Personalization and then select Customize icons in the taskbar (under the Taskbar and Start Menu heading). You’ll see a list of programs, find Sizer exectuable and set it to Show icon and notification. Press OK to accept the change.
Interactive resizing
Sizer also offers a feature that shows the current size of a window in a tooltip as you resize it. When windows are resized in the normal way a tooltip is displayed as shown below
In addition if you press and hold the Control key while resizing a window, Sizer will snap the window size to the nearest grid size. By default this grid size is 10 pixels, but this can be set to a different value in the Configuration Dialog.
Tooltip support makes use of a set of features that may not be available on all systems. I believe this only affects a very small number of systems, namely Windows 95 without Internet Explorer installed or using a version lower than IE 4. If this is the case on your system, Sizer will warn you and will disable interactive sizing, precise resizing and system tray resizing will continue work as before.
Configuring Sizer
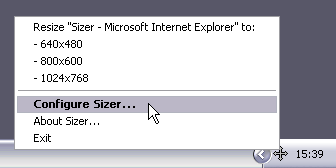
Sizer has a number of configuration options that control how precise and interactive sizing work. To access these options right click on the Sizer tray icon and select Configure Sizer... from the popup menu, as shown below.
Sizer displays the following dialog to allow its behaviour to be customised.
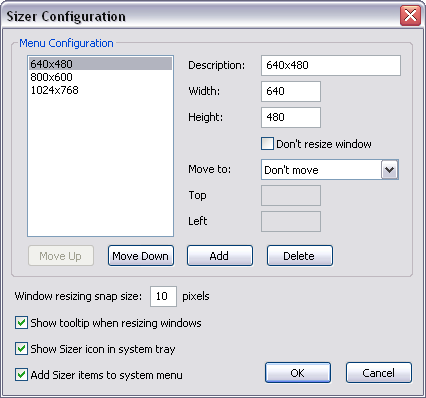
The Menu Configuration area is used to configure the list of sizes displayed in the popup menu when precise sizing is used. By default Sizer is configured to allow window resizing to 640×480, 800×600 and 1024×768. To add additional sizes click the Add button, then enter a Description, a Width and a Height into the relevant edit boxes. The order menu items are displayed can be customised by selecting an item from the list box and clicking the Move Up and Move Down buttons.
As well as resizing a window is it possible to reposition it as well. The Move To drop-down lists gives the option to reposition the window at the predefined points. If the User Defined option is selected, the Top and Left edit boxes are enabled allowing you to type while the top left corner of the window should be positioned. A value of Top = 0 and Left = 0 will reposition the window to the top-left of the screen. If you only want to reposition a window and not resize it set the Don’t resize window check box.
The lower part of the dialog is used to configure other Sizer options. The check box Show tooltip when resizing windows controls whether or not a tooltip containing the window size is displayed when a window is resized normally. The Window resizing snap size controls the grid size that windows are snapped to when the control key is held during resizing. The operation of these two options is described in interactive resizing.
Finally unchecking the option Show Size icon in system tray can be used to prevent Sizer showing its system tray icon. This can be useful if you’ve got a lots of applications in the system tray and you want to remove some of the clutter. With the system tray icon disabled, it’s not possible to access the configuration dialog as described above. Instead you’ll need to run Sizer again to popup the configuration dialog. In such cases only one copy of Sizer will be running so there’s no need to worry about using up memory with multiple copies.